Add your products to Google Merchant Center
If you run an online store and use sales platforms, you can integrate your store with Google services. This way, any product that is already entered into the system will go to Google Merchant Center. What’s more, every time you add a product to the database, it will automatically be added to the Merchant Center.
If the platform on which you sell on a daily basis can’t be connected to Google’s solution, or you don’t use any marketplace, you can upload a properly prepared spreadsheet with a list of products, or manually add the products you want to advertise on Google.
Important!
Google Merchant Center does not offer native integration for every sales platform. Still, it’s worth checking your sales service provider’s knowledge base for tutorials to connect your products from the store to the GMC database.
Google Shopping, or where will users see your product ads?
When you successfully add products to the database, they will start to appear in Google-related online locations. Users will be able to see and purchase your products:
- on Google search
- On the search result page,
- On the Purchasing tab,
- On the Graphics tab,
- In the Google Maps app and website,
- In the app and the YouTube website.
From now on, Google users will be able to hit your products while browsing sites and applications related to Google services. All they have to do is start searching for the items you are selling, or items similar to them. The recommendation engine will then show them products that match a given search – yours may be among them, with links leading directly to your store.
How much does it cost to use a Google Merchant Center account?
What may encourage many sellers to use Google Merchant Center is the lack of cost. Google’s service is free and allows you to add as many products to the database as you like. In this way, anyone running an online store can increase the reach of their offerings and attract new customers.
Of course, Google is not a charity, and as a result, the effectiveness of the Merchant Center is limited until the seller decides to purchase paid ads. Only promoting products in Google Ads unleashes the tool’s true potential. It is worth mentioning here that Google offers a friendly billing system, in which the seller pays not for displays, but for ad clicks (visits to the store’s website).
How do you prepare to create your first product campaign in Google Ads?
Before you can start promoting your products on Google Ads using Merchant Center data, you must first meet specific requirements.
First: set up and configure your Google Merchant Center and Google Ads accounts, then link them together.
Second: Ensure that the content of campaigns and product ads comply with the rules for product ads. The key point is that the rules for product ads are a separate document from the Google Ads rules.
Third: the products you sell must be properly described, and their data must be updated regularly – every 30 days. Google has developed specification standards that must be met in order to promote products through Google Ads campaigns. Among the required attributes are:
- basic product information,
- price and availability,
- Category,
- IDs,
- detailed description,
- Product campaigns and other configurations,
- trading platforms,
- destinations,
- Delivery,
- tax.
Important!
Google Merchant Center allows not only the synchronization of data between the sales platform and the product database, but also the updating of product data on the fly. However, you will launch the product campaign itself in Google Ads.
Google Ads product campaign step by step
Creating your first campaign to promote products from your store’s offerings can seem quite overwhelming. First you need to prepare: meet the requirements listed above, set up the appropriate accounts, link them together and make sure the products are properly described. Then there is still a process of several steps ahead. However, you can be sure that each subsequent campaign will be simpler to implement and will take much less time to launch.
Step one: goal and type of campaign
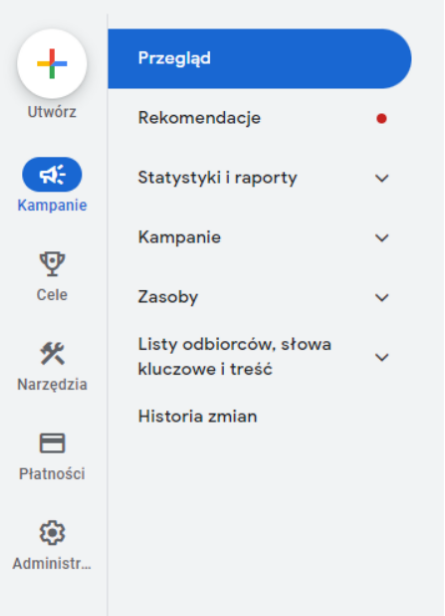
Log in to your Google Ads account and press the blue plus button. Select the “New campaign” option. You can also click the “Create” button in the menu on the left:

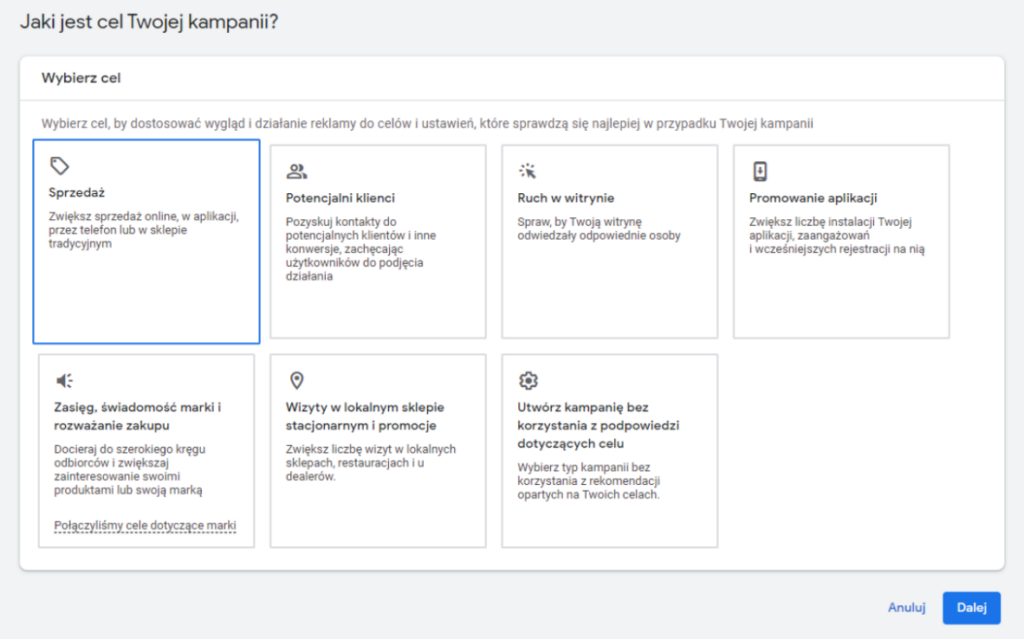
You can now define the goal of the campaign, that is, indicate what you want to achieve with it. Select “Sales” if you want to increase product sales, or “Potential customers” if you are looking to attract new people interested in your offerings. Want to get more people to your store? Select the goal “Site traffic” if you run an online store, or “Local stationary store visits and promotions” if the campaign is to target a physical store.
Learn how to promote your local business – offline and online!
You can also choose not to select a campaign goal – just click the “Create campaign without using the goal prompts” option – or create your own goals.
Then select a campaign type, such as the product campaign discussed today.
Step two: sync with Google Merchant Center and data files
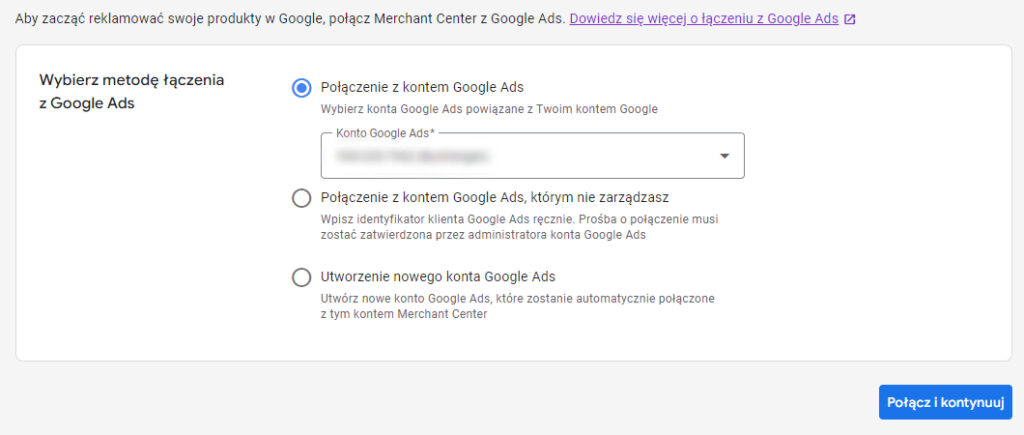
Now select your Merchant Center account containing the right products, i.e. the ones you want to promote. If you don’t see the right account, it means you need to link it to your Google Ads account first:
You can select data files at this stage with information about the products around which you are building a campaign. Two options are available: selecting data files by data file label or by sales country.
The next step is to select a campaign subtype. For the first campaign, select the “Standard Product Campaign” option.
Step three: campaign settings
Now it’s time to configure your advertising preferences. It is here that you will establish all the details that will make it easier to manage the campaign and achieve the expected results. Here is an example of an advertising preference screen. This view may vary depending on what kind of campaign you are creating:
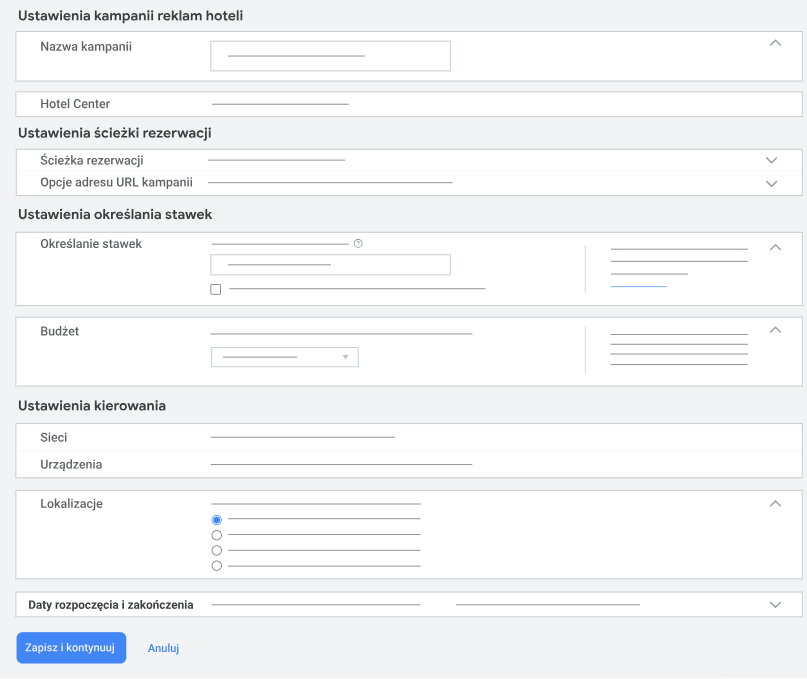
What can you do in this step?
- Determine the name of the campaign – you’ll find it later thanks to this, which is especially important when you’re launching more campaigns at once.
- Apply a resource filter – with this option you can limit the number of products used in a campaign. You can set filters so that only products that meet the guidelines will be promoted.
- Locally available products – set up advertising for products you offer in physical stores.
- Campaign URL options – configure tracking templates, add parameters to the URL.
- Specify rates – in this step you have a choice of different billing methods, including CPC rates (cost per click, or rate per click), CPV (cost per view, or cost per video viewed), as well as more specific variants like CPM (cost per mille, or rate per 1,000 impressions).
- Set a daily budget – here you can set the amount you do not want to exceed in the campaign.
- Campaign priority – is a setting by which you can prioritize when you promote one product in more than one campaign. Select the one from which the budget is to be triggered when advertising this product.
- Select networks – as we mentioned earlier, advertised products can be displayed in the “Shopping” tab, search engine, Google Maps and many other places. With network settings, you can choose exactly where you want the campaign to run.
- Select devices – analogous to the web, you can limit the display of a given campaign’s ads on specific devices. This is an especially useful setting when you realize that your store’s customers are far more likely to use – for example – smartphones than PCs.
- Select locations – again, Google Ads gives you the option to exclude some locations to maximize the effectiveness of your campaigns in areas of particular interest.
- Run local product assortment ads – use this option if your campaign wants to promote products available locally, in your brand’s physical stores. Remember that the data of these products must be assigned to the linked Merchant Center account.
After configuring all the above options, click the “Save” button. Time for the final step of preparing your first product campaign!
Step four: ad groups
Create an ad group, completing its name and rate. This group will consist of advertisements for selected products. The ads will be created automatically – for this, Google Ads uses product information it retrieves from the linked Merchant Center account. You can freely change both the name and the rate of the ad group after creating the campaign.
Save the results of your work and go to the product groups page. At this stage, you should be able to see a page containing the “All Products” group. This is where you will add more product groups and customize your campaign to meet all your objectives.
Summary
Your first product campaign in Google Ads is now ready. Thanks to the synergy of Google’s solutions – Ads and Merchant Center, as well as cooperation with your sales platform, you can promote your products on a large scale. You can use the Merchant Center for free, but only paid ads will enable you to use the full potential of Google’s services.
While doing so, remember to responsibly manage your advertising budget. Also be on hand to optimize product campaign settings on a regular basis. Monitor the level of spending and effectiveness of promotional activities to avoid burning through the advertising budget. A timely response and change of settings can save your company from considerable losses.